There are different ways to Set Up.
I give the students that I mentor a Set Up route to memorize because having one seems to lend itself to consistency and confidence.
I choose to teach them this Set Up route in particular for a couple of reasons:
- It’s easy to remember.
- It allows you to achieve an ideal position in the smallest amount of necessary space.
- And importantly, when the setup is finished and you put the truck in reverse, your tractor will be on a safe trajectory.
The red lines in the diagram show the path that your tractor will take for this setup. I call it the “Z” Set Up because the shape is similar to the letter Z.
Study the diagram:
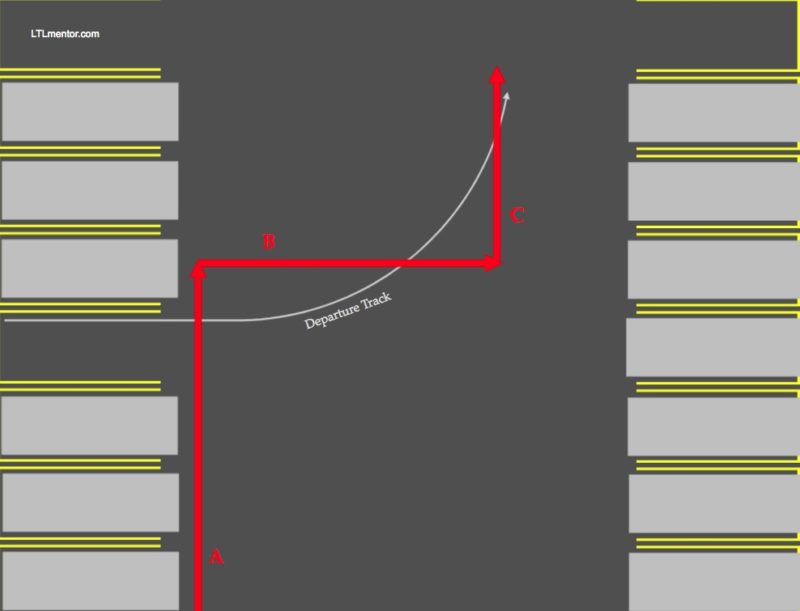
(Note: if you live in a country where the steering wheel is on the right side, this diagram would be flipped. Line A would be on the right, and Line C would be on the left.)
Notice in the diagram that Line A is closer to the row of trailers on the left, while Line C is farther away from the row of trailers on the right. This is by design.
You should always leave yourself a cushion of space on the passenger side.
You could wreck your front bumper on that side when following the trailer into the hole.
Leg A
The main purpose of Leg A is to get the trailer tires as close to the hole as possible. We accomplish this by getting the tractor as close to the hole as possible. While driving forward the trailer always follows the tractor.
I will usually draw out a rough sketch of the “Z“ Set Up route for my students on my clipboard as I talk them through it. Then we will go to a location for them to try it out for themselves. On most occasions what happens is that their Leg A ends up being much further to the right than it is in the diagram.
Whatever gap you leave between the driver’s side door and the left edge of your Set Up field will cause Leg B to be shorter by that same amount. That gap represents wasted space that you can’t get back. You have just made your Set Up field smaller than it needs to be.
I want you to see space as a valuable commodity. Be greedy when it comes to available space. A driver that uses all available space is safer and more efficient.

Passing the hole
As you near the end of Leg A, you will pass by the hole. Do not drive by the hole without looking closely at it.
I strongly recommend you stop at the hole and take notice of some details.
- Look for obstacles in your path. Did the last driver leave a wheel chock in your way?
- Is the dock plate extended or properly back in it’s resting position?
- Are both bumper pads in place?
Pick out a tire target
You should always have a very specific tire target. A spot on the ground at the opening of your target space that you can aim your trailer and rearmost tire at.
Usually, if there are yellow lines painted on the ground, your target would be just to the inside of the yellow line. But not all yellow lines are painted uniformly. Pay close attention to any neighboring trailers to get an idea of how close your tires need to be to the yellow lines.
How close are the other trailer’s tires sitting relative to the yellow line? Are they on the line? Just inside of the line? Or, are they a number of inches inside the line? Noticing these small details does not require extraordinary skills. You just need to be committed to forming new habits.
Picking a tire target will be a little more challenging when there are no yellow lines to guide you.
I have my students stop at a particular spot. Preferably directly in front of the dock bumper pad that will end up being on the driver’s side.
Imagine a line straight down from this pad, and a line straight out towards you. This is usually the path your trailer’s tires will be on. Pick out something on this path somewhere near the opening of the target space. You may have to get creative. Notice different colored spots on the ground along this tire path.
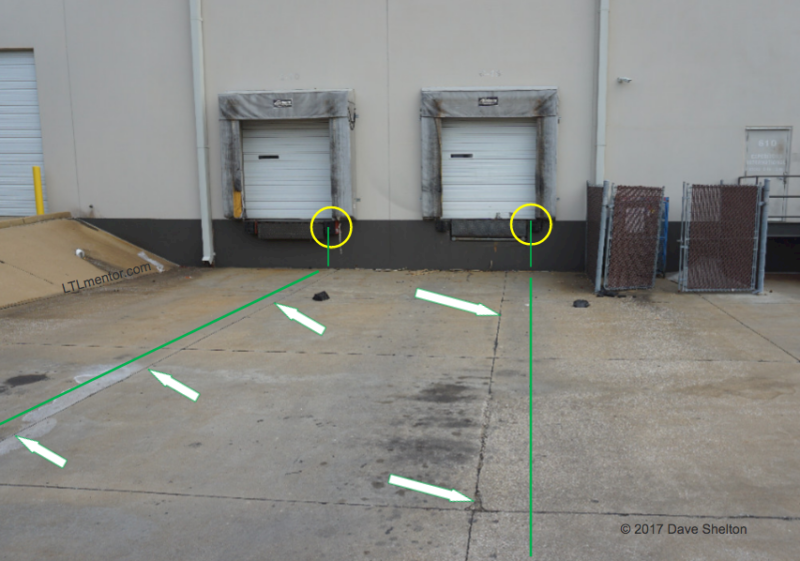
Start paying attention to details like the seams in the concrete.
These seams usually run perpendicular to the building. Sometimes you can use them as tire targets.
Tire targets are important because you have to get your tires onto the correct path first and foremost. Later, you can compare these lines with the bottom edge of your trailer while looking in your mirrors. If the two are parallel, you are square to the dock.
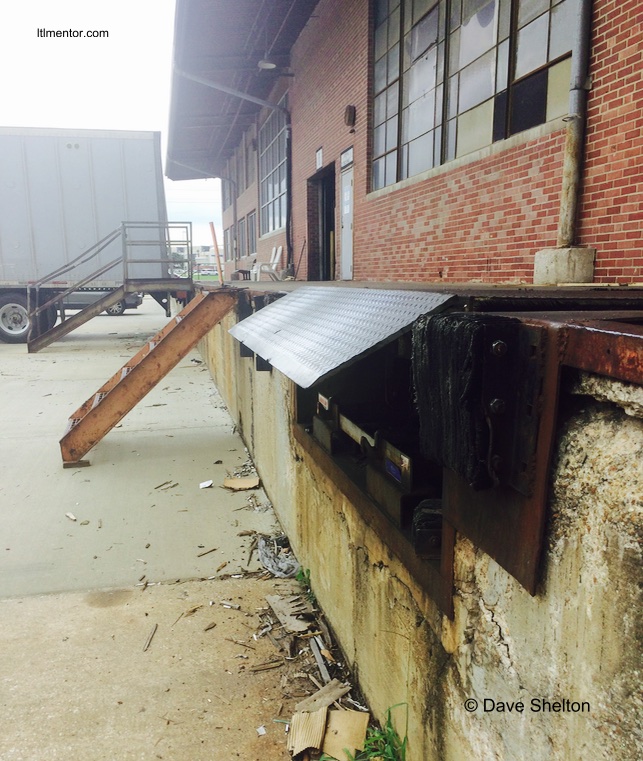
When I Set Up to the dock in the above photo, I estimated how far my tire path (the green line) was from the seam in the concrete and just told myself to aim for a spot just inside the seam by that amount.
Tip: You might drop an old leather glove out of your window onto the ground and use that as a tire target. You can roll over it and pick it up when you are finished.
Don’t underestimate the importance of having a clear tire target.
Leg B
The main purpose of Leg B is to pull the front of the trailer farther away from the target space than the rear of the trailer.
Your trailer needs to go from being perpendicular to the hole to being parallel or pointing at the hole. This is simply a start to that process. If there were no trailers on the right side you could extend Leg B until the trailer was pointing directly at the dock space and simply perform a “straight-line” back. In that case Leg C wouldn’t be necessary. But usually we will need a Leg C because of available space limitations.
Notice in the first diagram that Leg B starts slightly past the target space. How far past? For the sake of consistency let’s try to find a specific spot.
I know about where my driver’s side door is relative to the neighboring space when I start leg B. Since tractors vary in length I recommend using the drive tires as a guide. Pull forward until your “tire target” is between your drive tires. Notice where that puts your driver’s side door relative to the neighboring space and use that as an initial guide.
Set Up fields will vary in length and width.
This setup method is intended to make the most efficient use of available space.
Leg B is the most flexible of the three legs, and may vary in length and direction.
As a general rule, the shorter Leg B is — the longer Leg C will need to be.
The purpose of Leg B is not complicated but it has a specific purpose. Leg B is about creating some space and changing the position of the trailer. We are getting the trailer into a position that will make it easier to get back into the target space. Once you get familiar with what a good setup position is, you can experiment with the direction of Leg B.
For example, it may travel at a 45 degree angle relative to Leg A and head in a northwest direction and still accomplish a good position. Later when you learn to setup for an alley dock, you will find that legs B and C almost blend into one. It will still have the same basic shape; just more distorted with rounded corners.
Leg C
The main goal of Leg C is to achieve a final position that will make getting the trailer back into the target space, as easy as possible. I am referring specifically to the position of the tandems. The trailer tires need to be on an acceptable path.
In the diagram you will notice a curved line labeled “departure path”. Memorize the basic shape of this curved path.
Turning left onto Leg C creates a new angle between the tractor and the trailer. It creates “offset” and it puts our trailer and the target space within view of our driver’s side window.
The tricky part about Leg C is determining when to stop and start backing up.
Stop too soon and the trailer tires won’t be on the correct path. Stop too late and you will lose all of the offset between the tractor and the trailer.
The tractor and trailer in the diagram below is in what I would call an acceptable set up position.
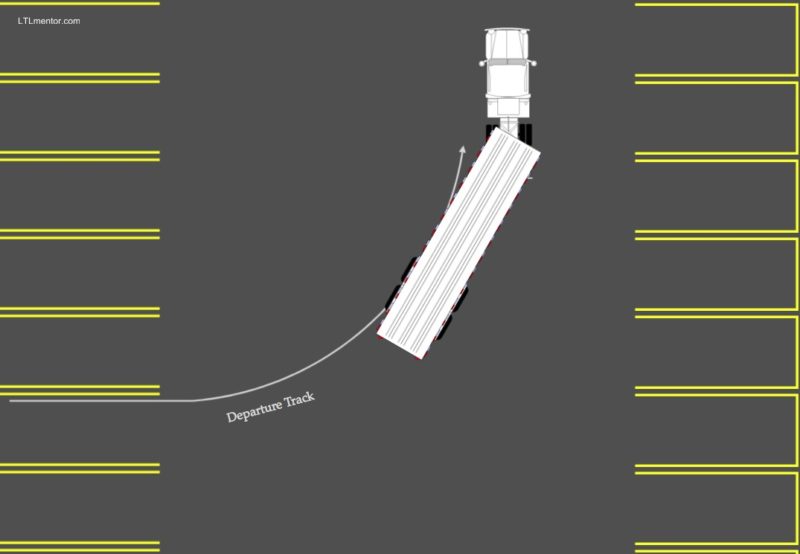
Here are some important details to notice and remember about a good setup position.
The rear of the trailer is closer to the target space than the front of the trailer. This was accomplished by driving close by the target space in Leg A, and pulling away from the target space during Leg B.
There is some offset between the tractor and the trailer. We need the trailer to rotate around it’s pivot point at the rear tandems and point at the target space. A little offset is needed to create more offset. (See my post about the Offset Law)
In this offset position you get a good view of the side of your trailer and the target space from your driver’s side window.
And most importantly the driver’s side tandems are on a departure path that leads into the target space. Practice visualizing these departure paths while looking out your window during Leg C. Stopping when your trailer tires are anywhere along the curve of this path will make things as easy as possible.
It is my opinion based on my experience that the ultimate goal of any setup should be to get the trailer tires to rest on a logical Departure Path. I will talk more about them in the next lesson.
Tractor Trajectory is very important.
You must start to develop an awareness and respect for your tractor’s trajectory starting on Day 1.
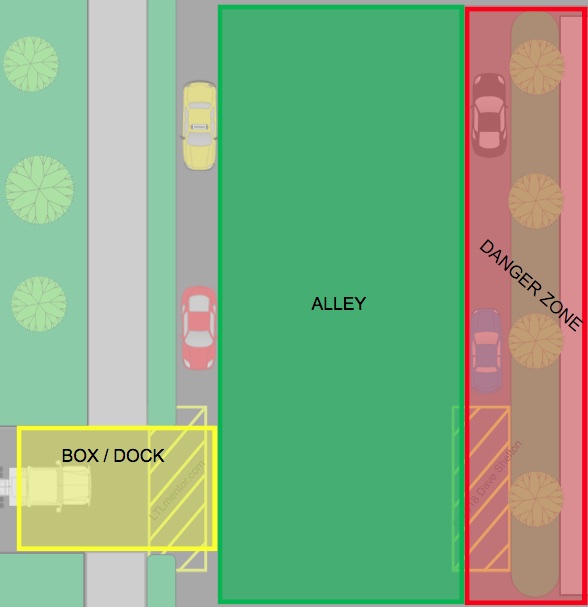
Danger Zone on the right 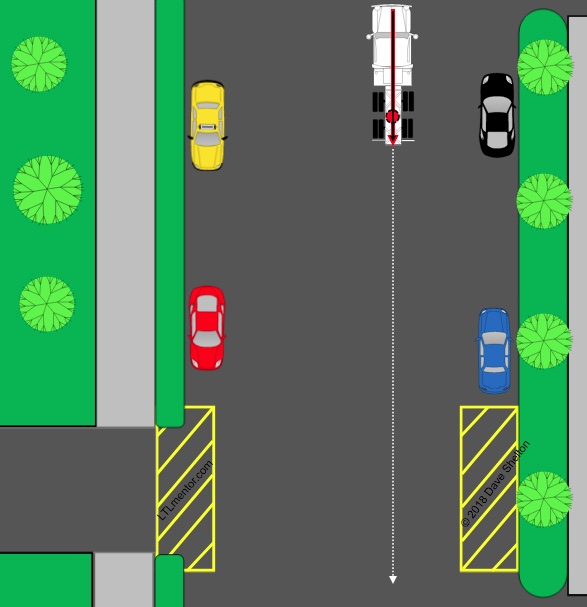
Safe tractor trajectory 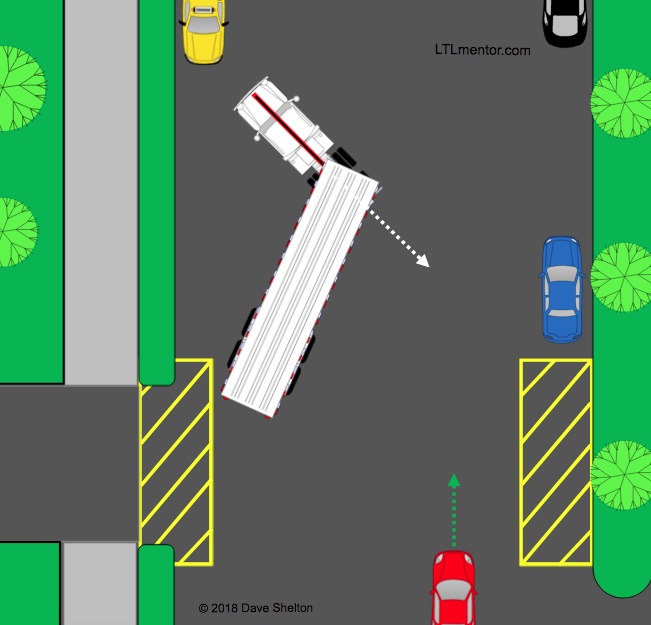
Dangerous trajectory!
I refer to everything on the passenger side of your tractor during Set Up as the “Danger Zone”. Many accidents happen to new drivers in this zone. When you start to follow the trailer into the target space with your tractor the front of your tractor will swing around. If you don’t leave a safety-cushion of space you can tear off your front bumper on the passenger side. It is a very common accident.
Always leave yourself a cushion of space between your tractor and everything in the Danger Zone.
Always be mindful of your tractor’s trajectory.
Summary
The main purpose of Leg A is to get the trailer tires as close to the hole as possible.
Leg B’s purpose is to pull the front of the trailer farther away from the target space than the rear of the trailer.
And the goal of Leg C is to achieve a final position that will make getting the trailer back into the target space, as easy as possible. I am referring specifically to the position of the tandems. The trailer tires need to be on an acceptable path. I call these Departure Paths.